Preparing the Grill for a Cook
Add Wood Pellets
- Before each cook visually check the wood pellets in the hopper.
- Pellets should be dry and have a shiny surface. Any sign of a puffiness could indicate they have absorbed too must moisture (possible in humid environments) and should not be used.
- Add enough pellets for the cook and flatten the surface out to allow an accurate level reading by the pellet sensor.
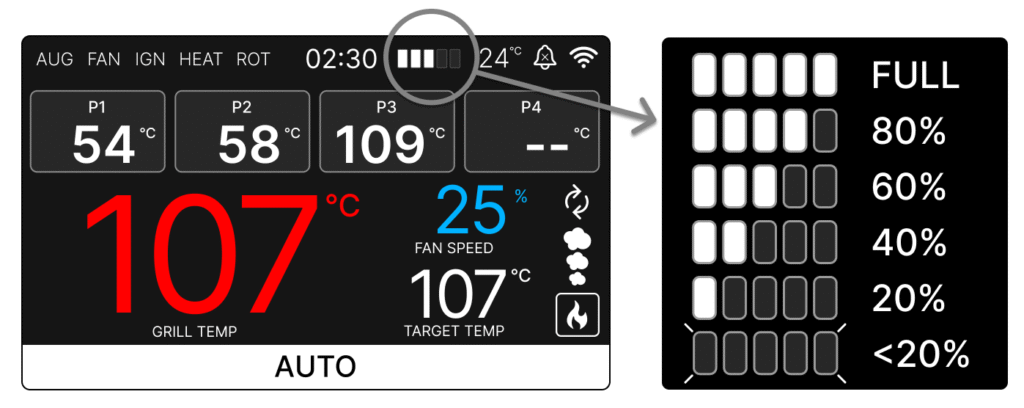
- Each of the 5 bars on the pellet gauge represents 1.2 kg of pellets, or around 5 hours of operation when set to 100℃ / 212℉ on a 20℃ day.
- Low temperature smoking using 0.2 to 0.3kg per hour
- High temperature cooking such as grilling, open flame searing, pizza dome or hotplate will use around 1 to 1.5 kg per hour.
- Pellet usage is higher when:
- The cooking temperature is higher
- The outside air temperature is low (winter)
Empty Ash Bin
- Use the ash dump handle to empty any remaining ash in the fire grate into the ash bin.
- DO NOT let the handle go like a pin-ball machine as the left fire grate may be kicked out of the correct position.
- Lift and slide out the ash bin and dispose of safely.
- Slide the ash bin back into place.
Empty Grease Bin
- Lift and slide out the grease bin.
- Take care as in hot weather the oil may still be in liquid form and splash out.
- Wash out the grease bin with hot soapy water.
- Slide the grease bin back into place.
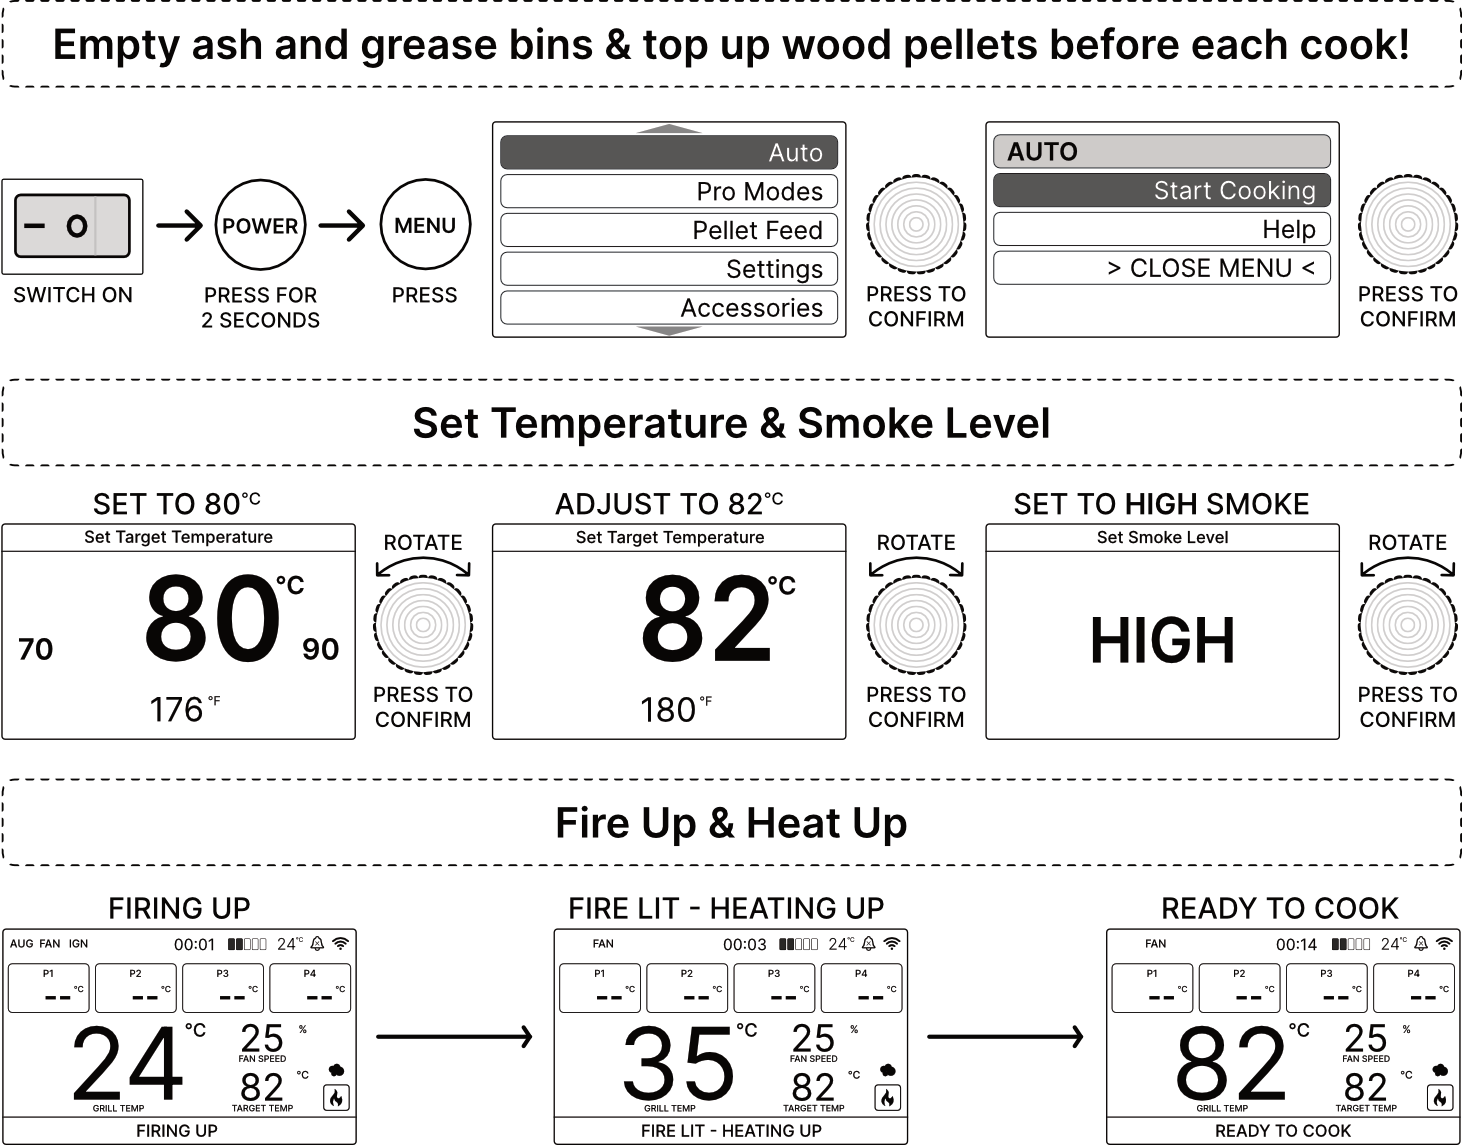
Firing Up
- The grill can be fired up with the lid shut.
- If firing up with the lid open, shut the lid as soon as smoke is released so the temperature inside the grill can rise and be detected by the controller.
- A temperature rise of at least 5℃ / 9℉ must be detected by the controller to determine that the fire has been successfully lit.
- Below is a quick overview of how to start a low-temperature smoking cook using AUTO mode.
- Click here to learn about all the different cooking modes.
Error 53 – No Fire Established
- If the controller does not detect a temperature rise in the grill within 5 minutes it is assumed the fire has not been lit and the grill will begin the shut down cycle (10 minute fan).
- This can also happen if the grill is already hot and then is fired up.
- For example: the grill is already at 200℃ and then attempted to fire up – while the fire may be successfully lit it is only a small fire, not big enough to heat up to 200℃ or higher.
- The controller will not detect a temperature rise so error 53 will occur.
- To prevent this from happening, open the lid for several minutes to allow the temperature to drop, then firing up and immediately close the lid so the temperature can rise back up.
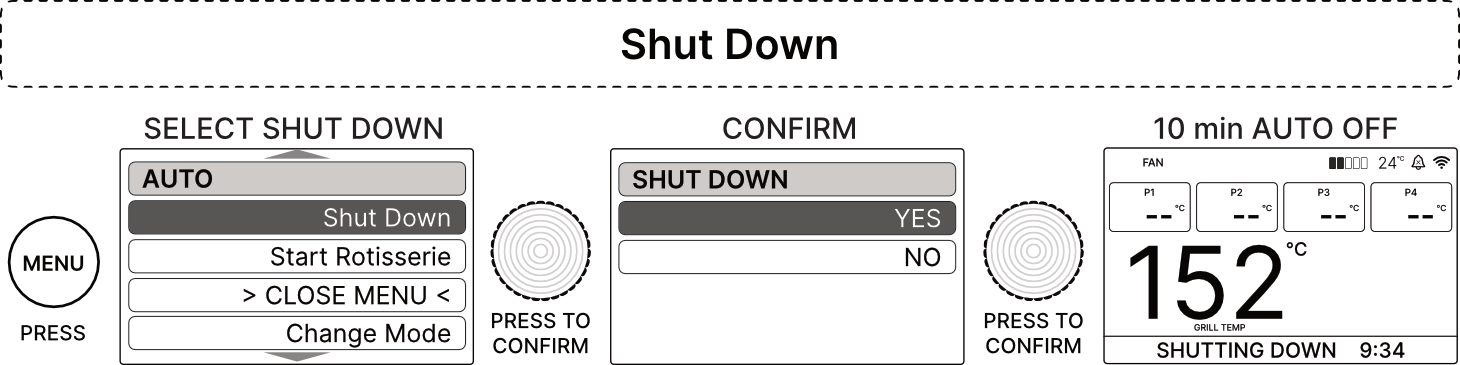
Shutting Down
- At the completion of a cook the grill needs to be safely shut down.
- The shut down process cycle involves continuing to run the fans for 10 minutes then the grill will turn itself off.
- The fans will speed up towards the end of the 10 minute period to blow lighter weight ash out of the fire grates.
- Follow the process outlined below.
Heat Sources
The S1 has three heat sources that can be used to cook food:
- Wood pellet fire
- Electric heating element
- Charcoal (lit external to the grill and poured in charcoal trays)
Dual Heat Source Benefits
- Dual heat sources provide the S1 with a number of advantages over wood pellet only smokers and grills:
- Faster heat up time to high target temperatures
- Wood smoked flavour (if desired) even when cooking at temperatures up to 200℃ / 392℉
- Lower wood pellet usage = lower running cost
- Electric heating only modes such as Dehydrator and Keep Warm
Heating Element Usage
- AUTO mode target temperatures of 135℃ / 275℉ and below for LOW, MEDIUM and HIGH smoke settings will only use the wood pellet fire (no heating element).
- AUTO mode target temperature above 135℃ / 275℉ using MEDIUM and HIGH smoke settings use will heating element and wood pellet fire.
- AUTO mode using LOW smoke settings up to 260℃ / 500℉ will only use the wood pellet fire (no heating element).
- AUTO mode above 260℃ / 500℉ the heating element is used together with the pellet fire.
- PIZZA DOME & HOTPLATE modes: Heating element used together with wood pellets for faster heat up time and lower wood pellet usage.
Smoke Levels
- Smoke is produced when wood pellets are delivered into the fire grate and smoulder before finally starting to burn with flames, at which point the smoke amount reduces.
- Smoke is produced in batches every 30 to 90 seconds, not continuously.
- At target temperatures of 135℃ / 275℉ and below, only the wood pellet fire is used (no heating element)
- HIGH smoke settings delivers more pellets each cycle with a longer time interval, for larger smoke releases.
- At these low temperatures (<110℃ / 230℉), even the LOW smoke setting will still produce some smoke as the fire is very small. For less smoke, use higher cooking temperatures.
- Smoke levels (LOW, MEDIUM & HIGH) can be set.
- The three smoke setting will ALL still produce smoke as the fire is small to maintain the low temperature.
- HIGH – 26% fan speed and lowest minimum pellet delivery for a smaller fire with maximum smouldering smoke.
- MEDIUM – 27% fan speed
- LOW – 28% fan speed and higher minimum pellet delivery for a slightly larger file with less smoke.
- What smoke setting to use? By default we recommend using the LOW smoke level, but it is great to experiment with the levels to find which works best for your cooking style and the types of pellets being used.
- If the fire sometimes goes out (temperature drops far below target and then spikes back up), try the LOW setting which has higher minimum pellet delivery than MEDIUM or HIGH smoke settings.
Cooking Modes
- The S1 supports a wide variety of cooking styles, so for convenience a range of cooking modes are built into the controller menu.
- AUTO mode is suitable for most cooking.
- PRO modes are more specialised cooking methods, such as Pizza or Rotisserie.
- Note that some cooking modes required certain accessories, such as the Hotplate, Pizza Dome or Rotisserie & Charcoal Tray. These items can be purchased from the Trimal online store.
AUTO Mode
- AUTO mode is suitable for most indirect heat cooking on the grill rack, including low ’n’ slow smoking, roasting, grilling and baking. Click here for full instructions.
- Temperature range from 70℃ to 300℃ (158℉ to 572℉).
PRO Modes
- Access PRO modes through the controller menu.
- It is possible to change to some Pro Modes when the grill is already operating in AUTO mode.
Wood Pellet Smoker
- This mode provides full temperature range operation (70℃ to 300℃ / 158℉ to 572℉) using only wood pellets for heat, not using the heating element. Click here for full instructions.
Open Flame Grilling
- Cook food directly over flames from the wood fire. Click here for full instructions.
Hot Plate Cooking
- Cook on the full size stainless steel BBQ hotplate. Click here for full instructions.
Charcoal Rotisserie
- Cook rotisserie style over charcoal for full flavour. Click here for full instructions.
Wood Fired Rotisserie
- Cook rotisserie with indirect wood fired heat. Click here for full instructions.
Pizza Oven
- Cook wood fired pizza with temperatures up to 400℃ / 752℉. Click here for full instructions.
Dehydrator
- Stable warm temperature and air flow for great drying results. Click here for full instructions
Fan Only
- Adjustable flow, no heat, for more creative ways to use the Trimal S1. Click here for full instructions.
Keep Warm
- If the electric heating element is installed, the Keep Warm function can be activated to use only the heating element (no fire) to maintain temperature, keeping food safely hot until ready to serve.
- Default temperature is 80℃ (176℉), but is adjustable from 20 to 80℃ (36 to 144℉) temperature rise above the ambient air temperature (as measured inside the hopper).
- If the heating element is NOT installed, then the Keep Warm function will just set to AUTO operation with target temperature of 80℃ (176℉) and LOW smoke level.
- The Keep Warm function is accessed through the menu when the grill is already fired up, and is available in the following operating modes:
- AUTO
- Pellet Only Smoker
- Hot Plate Cooking
- Wood Fire Rotisserie
- Pizza Dome
- To finish using the Keep Warm function, press Menu and then Shut Down. The fan will run for 10 minutes before automatically turning the grill off.
Cooking Hardware Guide
- Each cooking mode will set the appropriate heat source, suggested target temperature and display relevant information on the screen.
- The table below outlines how to use or position the drip trays, grill racks, open flame vent and vent cover for each mode.
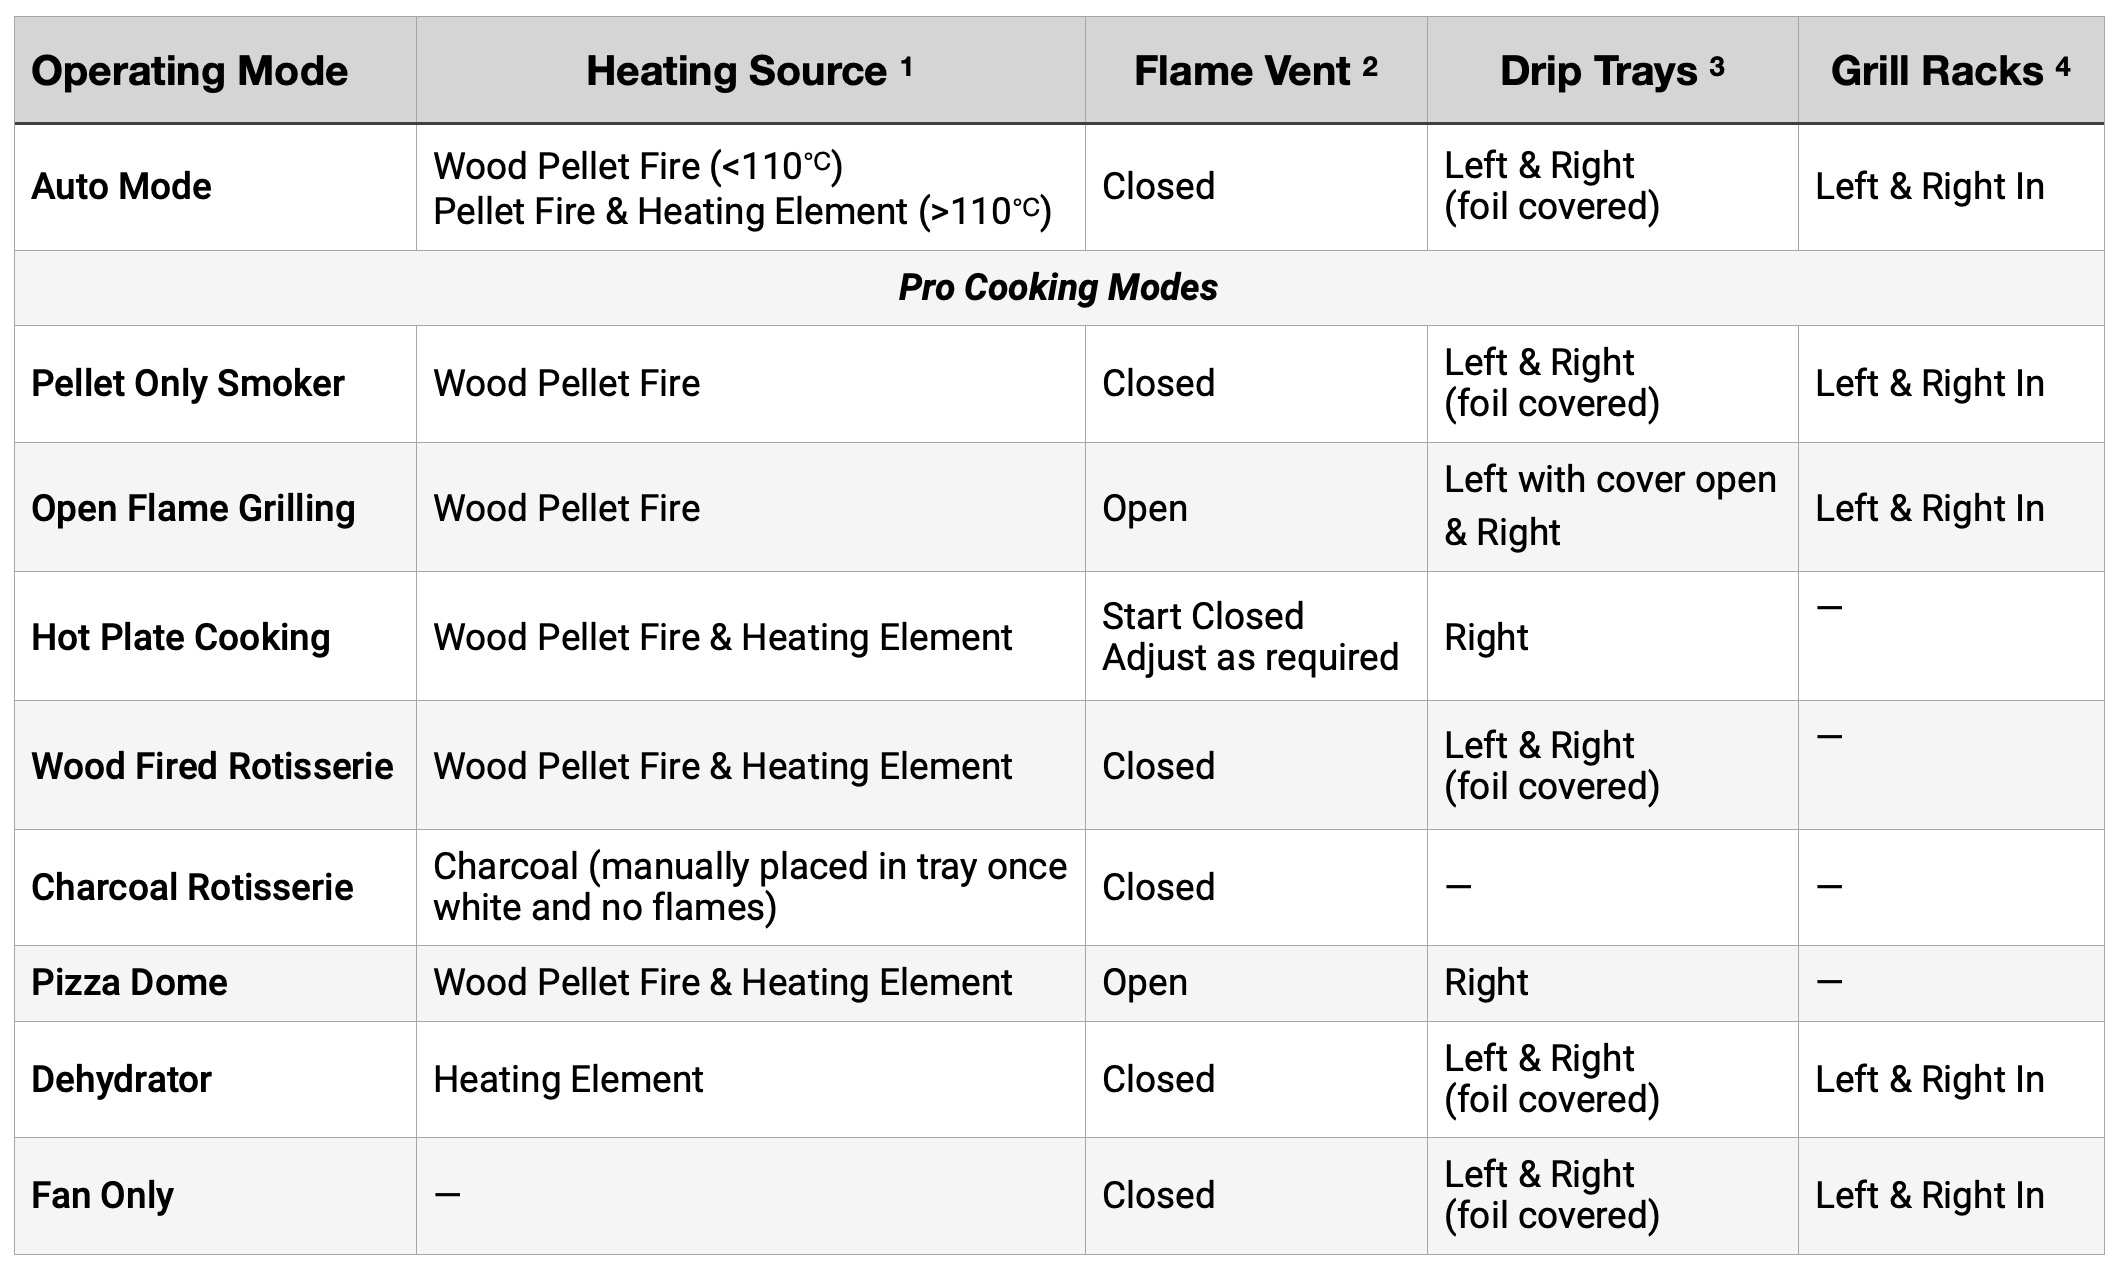
- Heating Element must be installed to be available for use. It will be automatically detected by the controller if installed.
- Heat baffle flame vent is opened with the top handle on the left side of the grill, allowing heat to rise up through the vents for higher temperatures.
- Drip trays are divided into left and right. The left grease tray has vents which can be opened by removing the vent cover, allowing heat through for open flame grilling. When not open flame grilling, put the cover on for better heat distribution and easier cleanup.
- Grill racks (left and right) should be removed to place in the HOTPLATE, PIZZA DOME or ROTISSERIE CHARCOAL TRAY.